





The Aussie Tanks on Weak Employment Report
Another day, another bout of volatility in Asia sparked by incoming data and expectations diverging.
Share this:


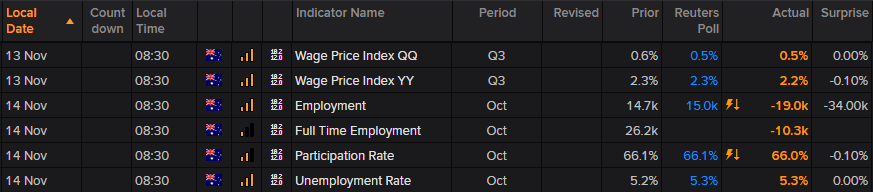
- Unemployment rose back to 5.3% (after a 1-month hiatus at 5.2%)
- Headline employment contracted by -19k (+15k expected) – its first contraction since September 2016
- Full-time employment fell -10.3k (+26.2k prior)
- Participation rate at a 4-month low of 66% (record high of 66.2% reached in August)
Another day, another bout of volatility in Asia sparked by incoming data and expectations diverging. Whilst unemployment was forecast at 5.3% - it’s a step in the wrong direction where RBA policy is concerned. Yet to see employment for the first time in over 3 years, full-time employment contract and the participation rate fall further from its record highs took its toll on the Aussie which has broken key levels across the board.
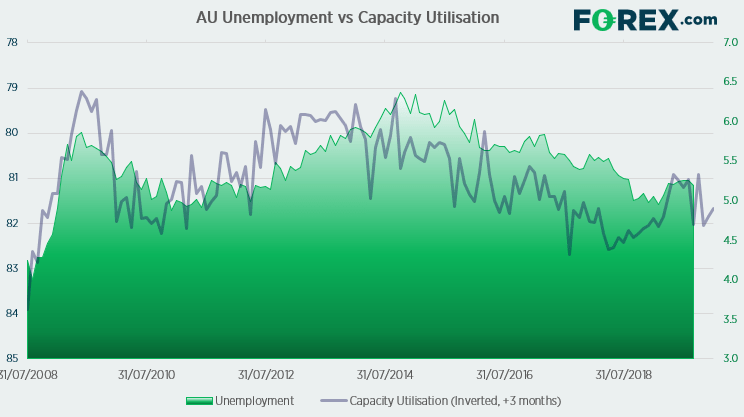
As it stands, RBA expect unemployment to sit around 5.25% through to 2021 before it falls to 5%. Yet if the inverted correlation with capacity utilisation is to hold true we could still see unemployment fall over the coming months. As always, the correlation is imperfect, but the basic trend is apparent; a rising capacity utilisation (falling on the chart) leads to lower unemployment, and visa-versa.
Still, after today’s data set, expectations for a rate cut are on the rise again, with April to May next year suggesting around a 60% chance. A cut in December is just 25%. We’ll have to wait until December 19th to see if this month’s data set is merely a blip, but for now the Aussie remains under pressure and could face further headwinds if trade talk optimism continues to fade.
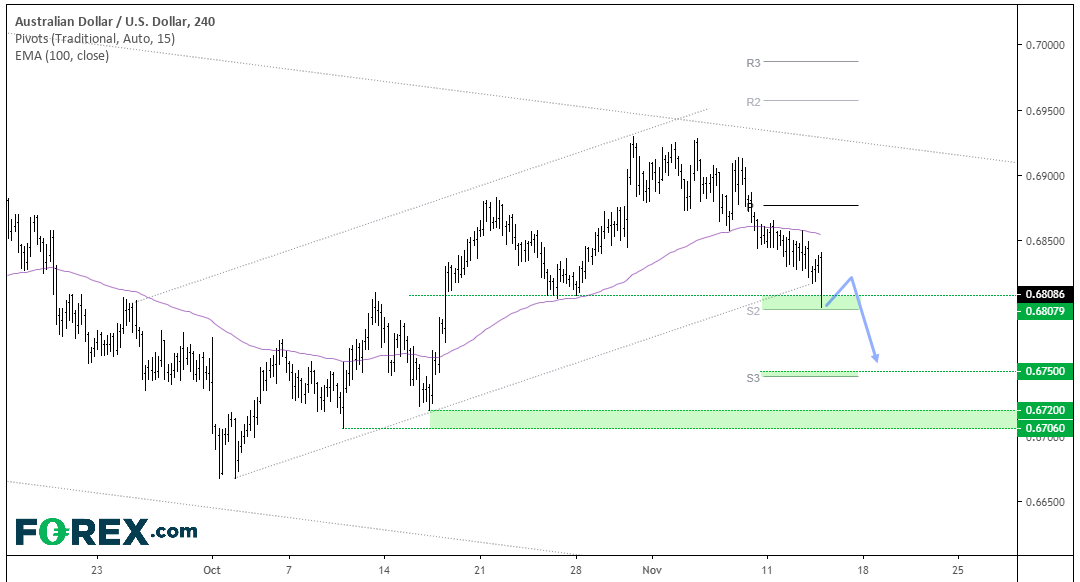
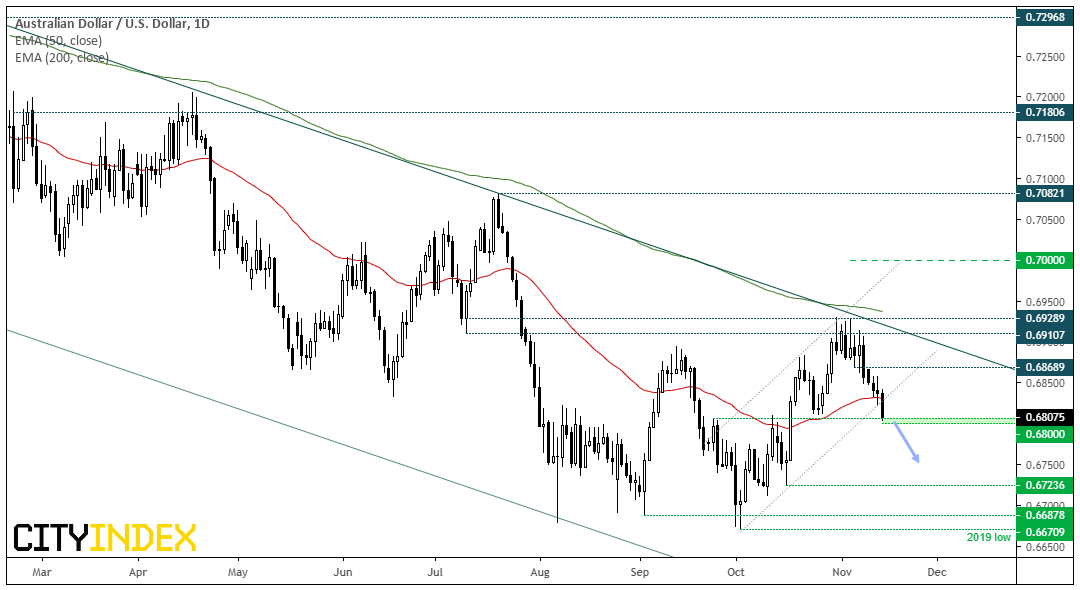
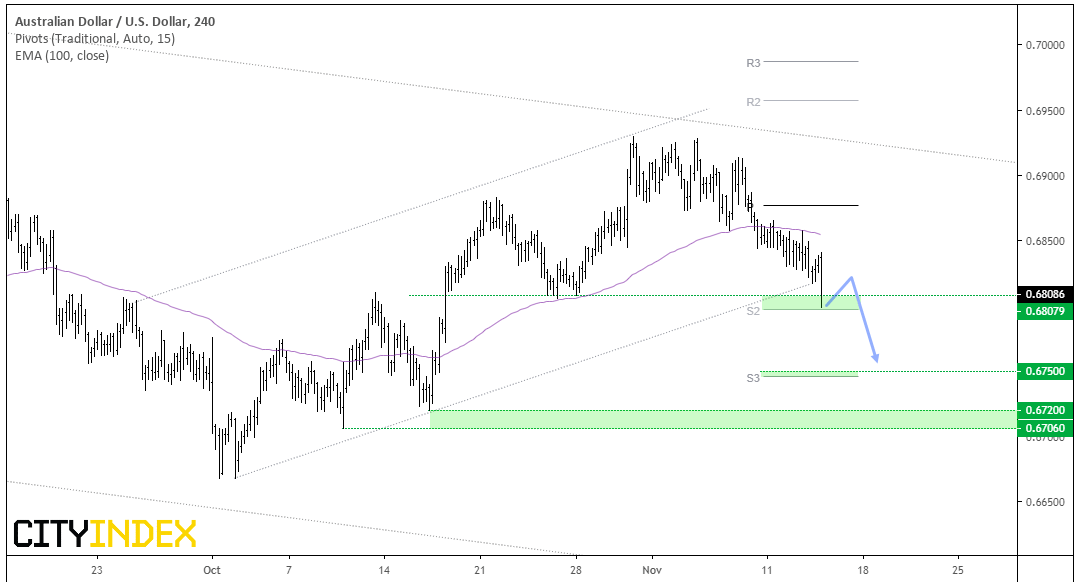
AUD/USD: The bearish channel and 200-day eMA capped as resistance ahead of its recent pullback, although today’s weak employment data saw prices break the corrective channel and now testing support just above 0.8600. Given its established downtrend and momentum has now realigned with it, the bias is for it to push to new lows.
- Bearing in mind that prices are now resting on support having reached 95% of its ATR, then it plausible to expect a pause or mild rebound from current levels at the very least.
- Daily trend remains bearish beneath the 0.6930 highs, although bears can fade into minor rallies beneath 0.6850 (momentum doesn’t favour a rebound that high though).
- A clear break of 0.6800 brings 0.6750 and 0.6723 low into focus.
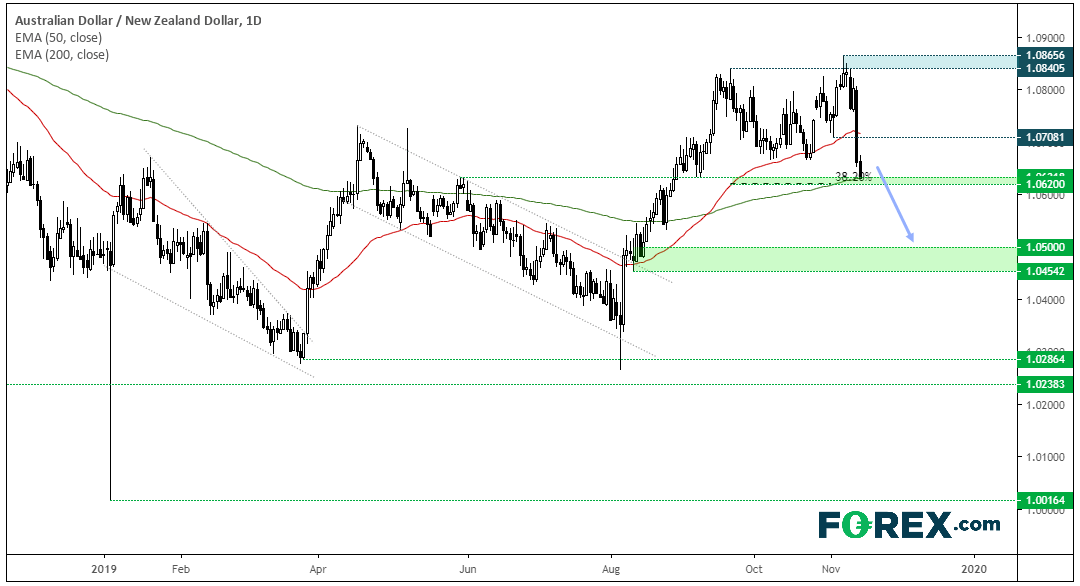
AUD/NZD: Given RBNZ may well keep rates at 1% over the foreseeable future (and above RBA’s 0.75%) then AUD/NZD could extend its downside. Today’s weak employment print and rising expectations for RBA to cut only adds to the diverging theme whilst prices remain elevated.
- A cluster of support around 1.0620 continues to hold (200-day eMA, 38.2% Fibonacci retracement and structural levels) so we could see a minor rebound before losses resume.
- A break below 1.0600/20 signals bearish resumption and brings the 1.0450 / 1.5000 zone into focus.
Related analysis:
Australian Dollar in the Hot Seat
RBNZ Hold Rate And Refrain From A Dovish Meeting – Is the Low in? | AUD/NZD
RBA Discussed Keeping Cuts For A Rainy Day | AUD/EUR, AUD/NZD
AUD Firmer On Lower Unemployment | AUD/JPY, AUD/NZD, EUR/AUD
- Unemployment rose back to 5.3% (after a 1-month hiatus at 5.2%)
- Headline employment contracted by -19k (+15k expected) – its first contraction since September 2016
- Full-time employment fell -10.3k (+26.2k prior)
- Participation rate at a 4-month low of 66% (record high of 66.2% reached in August)
Another day, another bout of volatility in Asia sparked by incoming data and expectations diverging. Whilst unemployment was forecast at 5.3% - it’s a step in the wrong direction where RBA policy is concerned. Yet to see employment for the first time in over 3 years, full-time employment contract and the participation rate fall further from its record highs took its toll on the Aussie which has broken key levels across the board.
As it stands, RBA expect unemployment to sit around 5.25% through to 2021 before it falls to 5%. Yet if the inverted correlation with capacity utilisation is to hold true we could still see unemployment fall over the coming months. As always, the correlation is imperfect, but the basic trend is apparent; a rising capacity utilisation (falling on the chart) leads to lower unemployment, and visa-versa.
Still, after today’s data set, expectations for a rate cut are on the rise again, with April to May next year suggesting around a 60% chance. A cut in December is just 25%. We’ll have to wait until December 19th to see if this month’s data set is merely a blip, but for now the Aussie remains under pressure and could face further headwinds if trade talk optimism continues to fade.
AUD/USD: The bearish channel and 200-day eMA capped as resistance ahead of its recent pullback, although today’s weak employment data saw prices break the corrective channel and now testing support just above 0.8600. Given its established downtrend and momentum has now realigned with it, the bias is for it to push to new lows.
- Bearing in mind that prices are now resting on support having reached 95% of its ATR, then it plausible to expect a pause or mild rebound from current levels at the very least.
- Daily trend remains bearish beneath the 0.6930 highs, although bears can fade into minor rallies beneath 0.6850 (momentum doesn’t favour a rebound that high though).
- A clear break of 0.6800 brings 0.6750 and 0.6723 low into focus.
AUD/NZD: Given RBNZ may well keep rates at 1% over the foreseeable future (and above RBA’s 0.75%) then AUD/NZD could extend its downside. Today’s weak employment print and rising expectations for RBA to cut only adds to the diverging theme whilst prices remain elevated.
- A cluster of support around 1.0620 continues to hold (200-day eMA, 38.2% Fibonacci retracement and structural levels) so we could see a minor rebound before losses resume.
- A break below 1.0600/20 signals bearish resumption and brings the 1.0450 / 1.5000 zone into focus.
Related analysis:
Australian Dollar in the Hot Seat
RBNZ Hold Rate And Refrain From A Dovish Meeting – Is the Low in? | AUD/NZD
RBA Discussed Keeping Cuts For A Rainy Day | AUD/EUR, AUD/NZD
AUD Firmer On Lower Unemployment | AUD/JPY, AUD/NZD, EUR/AUD
Latest market news




Open an account in minutes
Experience award-winning platforms with fast and secure execution, and enjoy tight spreads from 0.5 pts on FX and 0.3 pts on indices.
Economic calendar
Web Trader platform
Our sophisticated web-based platform is packed with features.
Related articles
AUD/USD Q4 Outlook: RBA and Fed Hikes Set the Tone
AUD/USD enters Q4 with RBA and Fed hikes in focus as sticky inflation, rising unemployment and US dollar strength shape the Australian dollar.

USD/JPY Q4 2026 Outlook: Hawkish Fed Pricing Clashes With Intervention Risk
The year-end tug-of-war is clear: hawkish Fed pricing supports USD/JPY, while intervention risk limits the upside.


Japanese Yen Forecast: USD/JPY 4% Rally Challenges Post-Intervention Downtrend 9 24 2026
USD/JPY momentum has shifted sharply higher, putting a major resistance confluence in focus as U.S. and Japanese event risk builds.

This report is intended for general circulation only. It should not be construed as a recommendation, or an offer (or solicitation of an offer) to buy or sell any financial products. The information provided does not take into account your specific investment objectives, financial situation or particular needs. Before you act on any recommendation that may be contained in this report, independent advice ought to be sought from a financial adviser regarding the suitability of the investment product, taking into account your specific investment objectives, financial situation or particular needs.
StoneX Financial Pte. Ltd., may distribute reports produced by its respective foreign entities or affiliates within the StoneX group of companies or third parties pursuant to an arrangement under Regulation 32C of the Financial Advisers Regulations. Where the report is distributed to a person in Singapore who is not an accredited investor, expert investor or an institutional investor (as defined in the Securities Futures Act), StoneX Financial Pte. Ltd. accepts legal responsibility to such persons for the contents of the report only to the extent required by law. Singapore recipients should contact StoneX Financial Pte. Ltd. at 6826 9988 for matters arising from, or in connection with the report.
In the case of all other recipients of this report, to the extent permitted by applicable laws and regulations neither StoneX Financial Pte. Ltd. nor its associated companies will be responsible or liable for any loss or damage incurred arising out of, or in connection with, any use of the information contained in this report and all such liability is hereby expressly disclaimed. No representation or warranty is made, express or implied, that the content of this report is complete or accurate.
StoneX Financial Pte. Ltd. is not under any obligation to update this report.
Trading CFDs carries a high level of risk that may not be suitable for some investors. Consider your investment objectives, level of experience, financial resources, risk appetite and other relevant circumstances carefully. The possibility exists that you could lose some or all of your investments, including your initial deposits. If in doubt, please seek independent expert advice. Visit www.forex.com/en-sg/terms-and-policies for the complete Risk Disclosure Statement.