



Australian Dollar Price Action Setups: AUD/USD, AUD/JPY, EUR/AUD
The Australian dollar is flashing signs of weakness across key major pairs, with AUD/USD showing downside risk, EUR/AUD hinting at a corrective bounce, and AUD/JPY stretched amid intervention uncertainty.
Share this:

The Australian dollar is entering a tactically interesting phase, with price action diverging across key crosses. While AUD/USD momentum is rolling over near major volume and trend levels, EUR/AUD is showing early signs of a corrective bounce within a broader bearish structure. At the same time, AUD/JPY remains stretched following a powerful rally, leaving traders caught between trend continuation and intervention risk.
View related analysis:
View related analysis:
Australian Dollar Technical Setups
AUD Price Action Themes
Momentum is fragmenting across AUD pairs, with downside risks building against the US dollar, corrective potential emerging against the euro, and trend exhaustion risks rising against the yen.
Australia’s FX Outlook
AUD weakness is becoming more selective rather than broad-based, suggesting traders should stay tactical rather than directional across crosses.
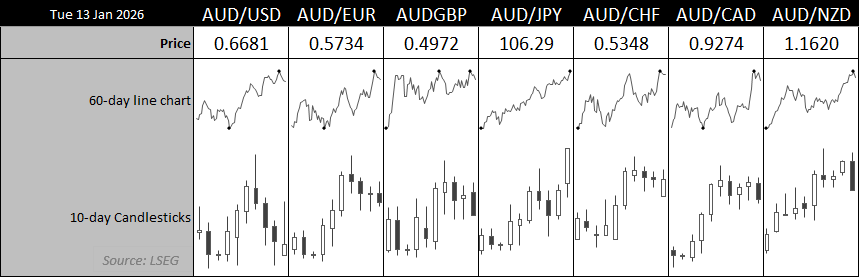
Chart source: LSEG
AUD/USD Technical Analysis: Australian Dollar vs US Dollar
On Monday, I outlined my bias for AUD/USD to retrace to at least 0.6640 near its December VPOC (volume point of control), and momentum is now turning in the call’s favour. The Aussie enjoyed a decent bounce from mid-November through to last week’s high, before momentum reversed and left a weekly shooting-star candle around the 67c handle.
Risk reversals are also pointing lower, showing a pick-up in puts relative to calls. However, implied volatility has yet to rise despite growing odds that the US could become actively involved in Iran — a move that would likely spark a bout of risk-off sentiment and weigh on risk-sensitive currencies such as the Australian dollar.
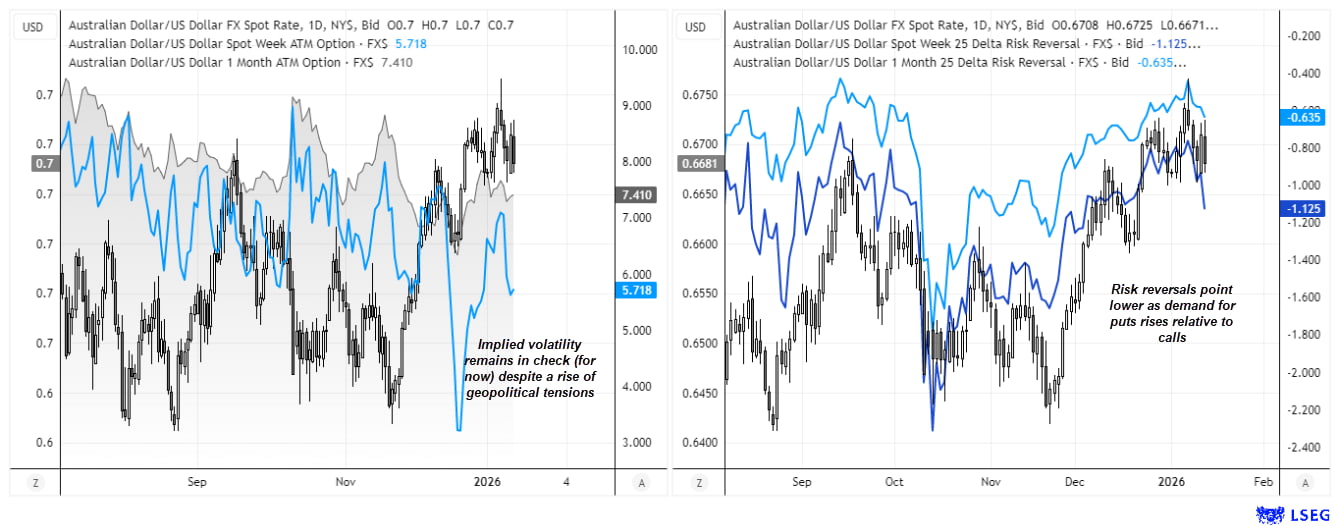
Chart analysis by Matt Simpson - source: LSEG
With prices near the lows of last week’s bearish pinbar, a break below it brings the 10-week EMA (exponential moving average) around 0.6640 and the monthly pivot point into focus for AUD/USD bears. A move below that level would then bring the 66c handle into view near the 20-week EMA. And with Tuesday printing a bearish engulfing candle at the October 2024 VPOC (volume point of control) and pushing prices back down to the 20-day EMA, the Aussie may be setting up for a dip lower sooner rather than later.
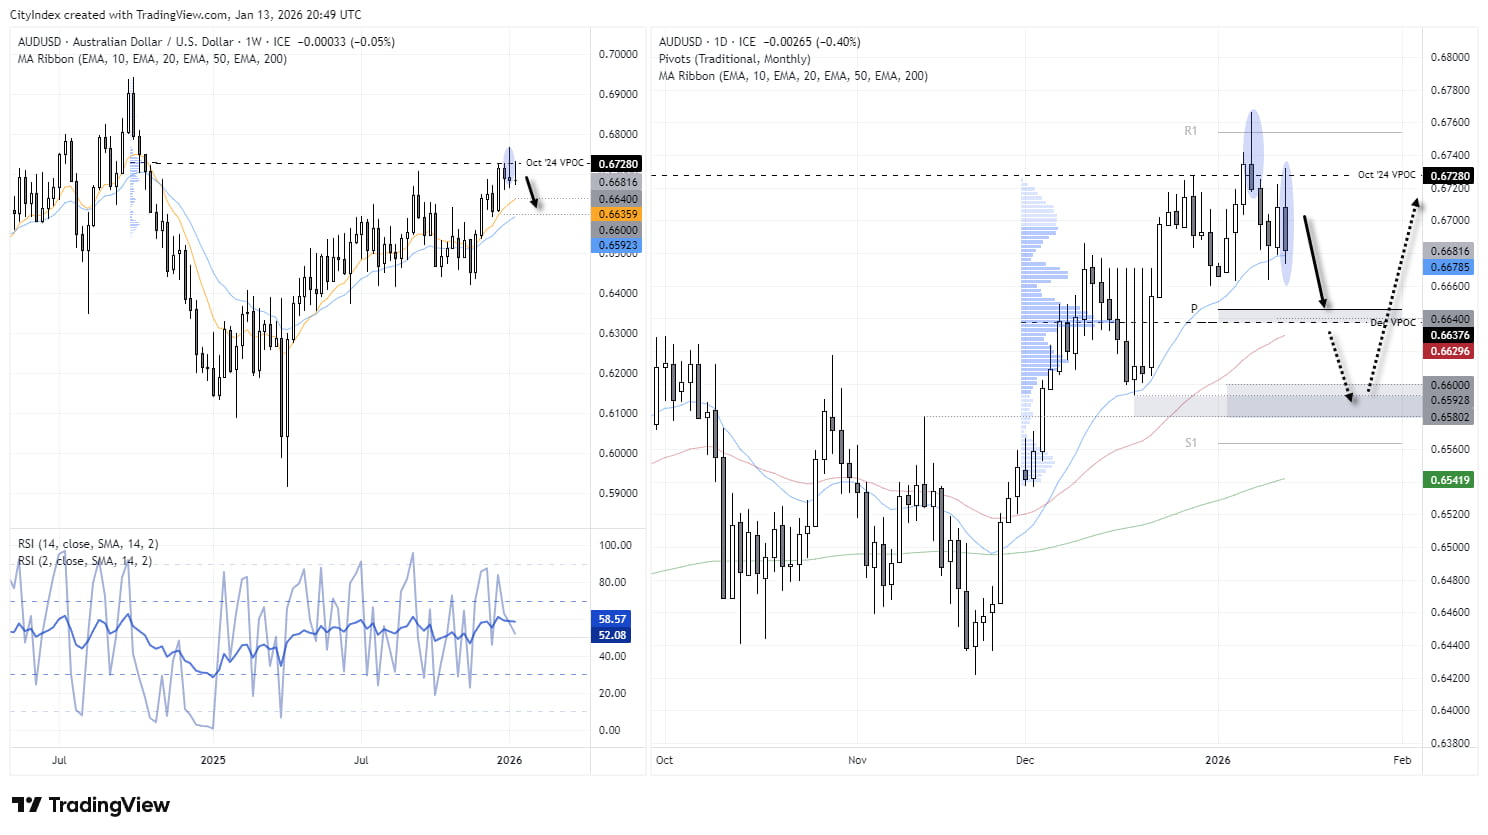
Chart analysis by Matt Simpson - source: TradingView AUD/USD


EUR/AUD Technical Analysis: Euro vs Australian Dollar
While a broader bearish move in EUR/AUD is underway — and one that still has scope to accelerate lower — near-term price action points to the potential for a countertrend bounce.
A doji formed on the daily chart at the 1.73 handle last week, and Tuesday’s bullish engulfing candle suggests a higher low is forming while testing the monthly S1 pivot point. A break above this level would signal scope for a deeper retracement.
Near-term upside targets for EUR/AUD bulls include the December VPOC (volume point of control) at 1.7540, the 200-day EMA (exponential moving average) near 1.7572, and the 1.76 handle. A break above the monthly pivot point at 1.7626 would invalidate the prior swing high and negate the near-term bullish bias.
Beyond any anticipated bounce, my broader bias remains for EUR/AUD to fall towards the 1.70 handle over time.
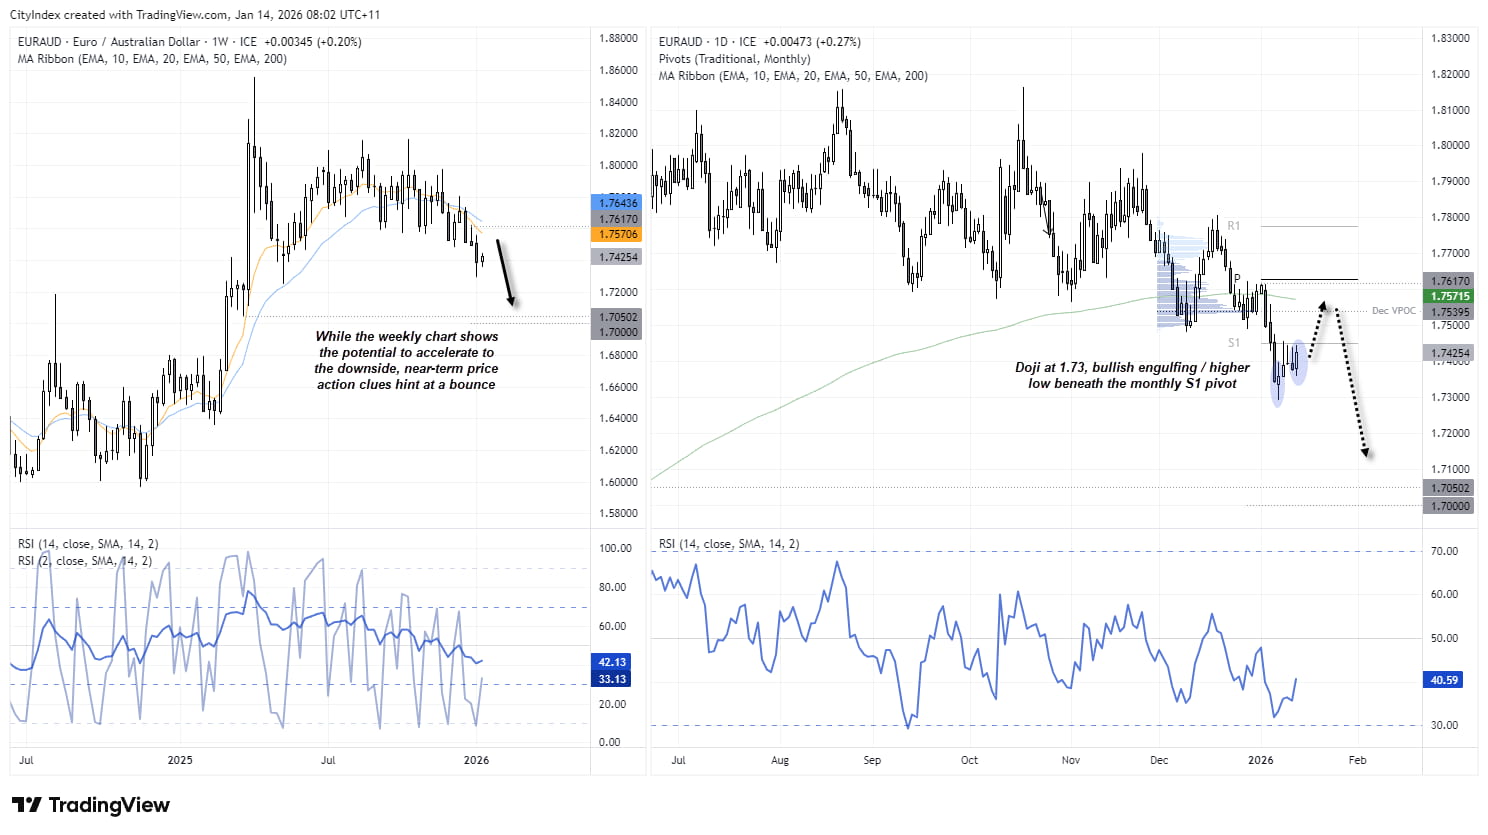
Chart analysis by Matt Simpson - source: TradingView


AUD/JPY Technical Analysis: Australian Dollar vs Japanese Yen
The Australian dollar has taken full advantage of a weaker Japanese yen since its April low, with AUD/JPY up around 24% amid a lack of intervention from Japan’s Ministry of Finance (MOF) and an insufficient pace of rate hikes from the Bank of Japan (BOJ).
However, if yen bears continue to push USD/JPY sharply higher in an effort to provoke MOF intervention, that could disrupt the trend and trigger a sharp pullback in AUD/JPY. By contrast, a steady and orderly depreciation in the yen reduces the urgency for intervention and could allow AUD/JPY to continue grinding higher.
Either way, bulls may want to tread carefully at these levels. A shooting-star candle formed at 17-month highs on Tuesday, with prices now extended from the 10-day EMA (exponential moving average) — a dynamic support that has underpinned the rally in recent weeks.
Bulls may prefer to wait for a low-volatility pullback towards the 10-day EMA to assume trend continuation. Bears looking to fade this strong uptrend may have the MOF as a potential catalyst if timed perfectly, although the clear risk is “death by a thousand cuts” via repeated stop-outs if Japan’s authorities remain on the sidelines.

Chart analysis by Matt Simpson - source: TradingView
View the full economic calendar
View the full economic calendar
-- Written by Matt Simpson
Follow Matt on Twitter @cLeverEdge
How to trade with City Index
You can trade with City Index by following these four easy steps:
- Open an account, or log in if you’re already a customer
• Open an account in the UK
• Open an account in Australia
• Open an account in Singapore
- Search for the market you want to trade in our award-winning platform
- Choose your position and size, and your stop and limit levels
- Place the trade
Related tags:
Latest market news




Open an account in minutes
Experience award-winning platforms with fast and secure execution, and enjoy tight spreads from 0.5 pts on FX and 0.3 pts on indices.
Economic calendar
Web Trader platform
Our sophisticated web-based platform is packed with features.
Related articles
USD/CAD reversal risk builds as central bank showdown looms
USD/CAD has delivered a bullish reversal signal from established support, just as traders prepare for Fed and BoC decisions. Aggressive Canadian rate hike expectations and conflicting momentum signals make the coming session important.
Australian Dollar Outlook: AUD/USD Screams Sentiment Extreme Into Fed, CPI
AUD/USD rebounds despite record bearish futures positioning, with Australian Q3 CPI and the Fed meeting threatening to trigger another short squeeze.
EUR/USD weekly outlook: FOMC and ECB to set the tone
The current backdrop is modestly bearish. On Friday, the EUR/USD closed modestly lower, down for the third consecutive day. The pair also posted a weekly decline after staging a modest recovery attempt in the previous week. Out of the past 8 weeks, the EUR/USD has fallen on 6 occasions. There is not much supporting factors for the single currency right now. So, the upside remains capped.

This report is intended for general circulation only. It should not be construed as a recommendation, or an offer (or solicitation of an offer) to buy or sell any financial products. The information provided does not take into account your specific investment objectives, financial situation or particular needs. Before you act on any recommendation that may be contained in this report, independent advice ought to be sought from a financial adviser regarding the suitability of the investment product, taking into account your specific investment objectives, financial situation or particular needs.
StoneX Financial Pte. Ltd., may distribute reports produced by its respective foreign entities or affiliates within the StoneX group of companies or third parties pursuant to an arrangement under Regulation 32C of the Financial Advisers Regulations. Where the report is distributed to a person in Singapore who is not an accredited investor, expert investor or an institutional investor (as defined in the Securities Futures Act), StoneX Financial Pte. Ltd. accepts legal responsibility to such persons for the contents of the report only to the extent required by law. Singapore recipients should contact StoneX Financial Pte. Ltd. at 6826 9988 for matters arising from, or in connection with the report.
In the case of all other recipients of this report, to the extent permitted by applicable laws and regulations neither StoneX Financial Pte. Ltd. nor its associated companies will be responsible or liable for any loss or damage incurred arising out of, or in connection with, any use of the information contained in this report and all such liability is hereby expressly disclaimed. No representation or warranty is made, express or implied, that the content of this report is complete or accurate.
StoneX Financial Pte. Ltd. is not under any obligation to update this report.
Trading CFDs carries a high level of risk that may not be suitable for some investors. Consider your investment objectives, level of experience, financial resources, risk appetite and other relevant circumstances carefully. The possibility exists that you could lose some or all of your investments, including your initial deposits. If in doubt, please seek independent expert advice. Visit www.forex.com/en-sg/terms-and-policies for the complete Risk Disclosure Statement.